
Business hours can be set up in My.Phone.com or Control.Phone.com, depending on which tool you use to administer your account.
Set Up Business Hours Using My.Phone.com
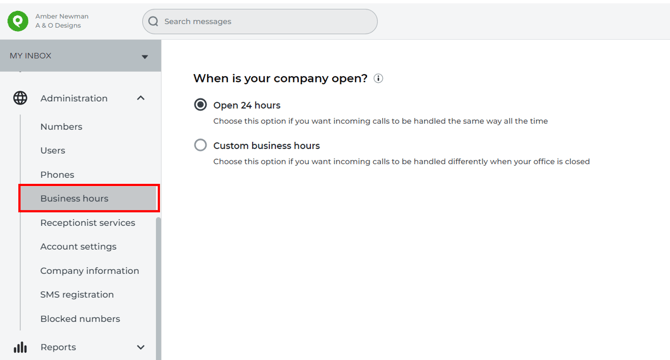
If you do not see the Business Hours option under the Administration drop down in my.phone.com, use the instructions to set up business hours using the Control Panel.
Time Zone
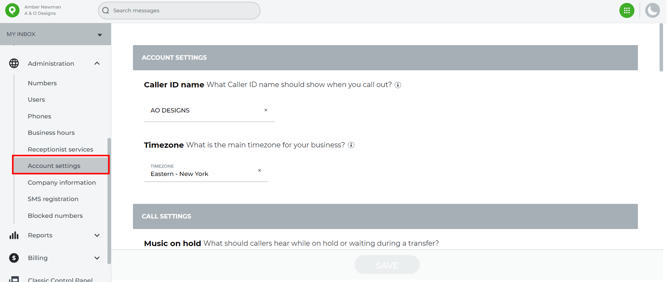
Since company business hours are based on the time of day it is important to make sure that the company time zone is set accordingly. To do this, simply access the select the Account settings option from the Administration Dropdown in the left Navbar. Select the Time Zone field located within the General Settings Tab under the Company Info section, then save.
Setting up your company business hours
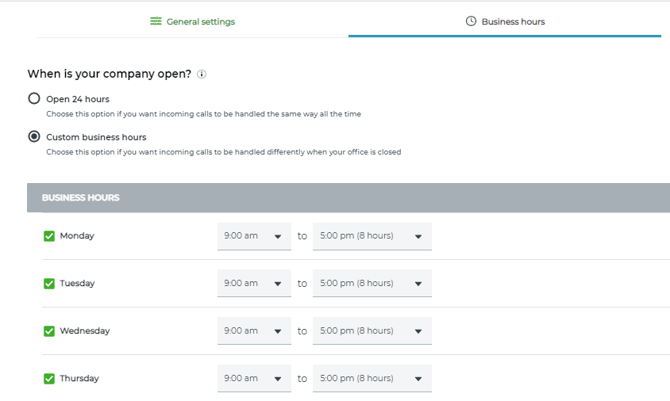
After setting your Time Zone, you will have to navigate to the Business Hours Tab located under the Administration drop down, from here, you will see that Open 24 hours is selected by default. Simply select the Custom business hours option to begin setting up your hours of operation.
After selecting the Custom business hours you will see the work-week section appear below with some pre-selected days and hours (Monday – Friday 9am – 5pm) you can uncheck any days where your business will be closed and access the drop-down list for the start and end times to change the hours of operation according to your business needs.
Setting up your company lunch hours
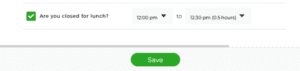
Now that you’ve completed setting up your business hours, it’s time to select whether or not you will be closed for lunch. The system will automatically check the box for lunch and set a specific time window for you, to change this, simply select the start and end times for your lunch hours or if you plan on staying open during lunch, uncheck the box on the left altogether.
U.S Holidays
The US Holiday section helps administrators simplify the setup process for companies that either observe or work during certain holidays. To customize your holiday schedule, simply toggle on the Holiday switch to ON. You will notice that all holidays listed will be checked off and set to Closed – This means your business plans on being closed for that specific day.
If you plan on working irregular hours for any of the listed holidays select the drop-down option where it says Closed and select Custom Hours instead and set the hours you plan on having your business operate for that day. If you prefer to have the holiday default to your regular business hours simply uncheck the box for that day and save the changes.
Setting up Custom Days
Some companies observe extracurricular activities such as Christmas parties or picnics for their employees. To set up a custom day toggle the other days or business hours switch to ON – this will automatically create a new entry. Form here, provide a name for the event, select the date field using the calendar pop-up, then select if the event will be only once or if it is recurring yearly, and specify if your business will be closed or open. If you plan on having your business operate, select Custom Hours and, set the start and end times, then save. If you need additional days select the Add a day option below – to remove any previously created entry, select the X located on the far right.
Open Hours
After you have set your business hours, it is time to configure your main company number. To do this, navigate to the Numbers App using the left Navbar and select the Edit icon (looks like a pencil) – Once you are on the configure number page, select the drop-down at the top and select Main company number from the list. You will see four subsections (Open hours, After hours, Holidays, and Lunch break)
Select the Open hours option if not yet selected and begin configuring the phone number; this will tell the system how to handle any phone calls that arrive during your previously set business hours, then save.
After Hours
The next step is to set up how you want to handle your calls when they arrive outside your business hours. Simply select the After hours option and configure the phone number according to your business needs. This will ensure that when a call arrives before or after your hours of operation, it is handled properly.
Holidays
If you opted to be closed for any of the listed Holidays under the Business Hours section the system will automatically route the calls according to your After hours call settings. If you wish to change this simply toggle OFF the Same as after hours switch and configure the call accordingly.
Lunch Break
If you opt to be closed during lunch hours under the Business Hours section, the system will automatically route the calls that arrive during that time window according to your after hours settings. If you wish to change this simply toggle OFF the Same as after-hours switch and configure the call accordingly, then save.
Setting up Business Hours for voice lines
You can apply your saved company business hours to any phone number by accessing the number configuration flow and then toggling the Use company business hours switch to the ON position – Doing this effectively allows you to customize how the call gets handled according to the day of the week and time of day.
To disable this simply set the toggle switch back to the OFF position and all calls to that phone number will follow the same rule no matter what day or time they are received.
Set Up Business Hours in Control.Phone.com
Adding a Schedule
Keep in mind that you might need to add multiple Phone.com schedules to cover your daily or weekly work schedules. The steps below are for a single, basic schedule setup.
Start by logging into the Control Panel for advanced system configuration.
- Mouse over Configure and click Add a Schedule.
- Enter a unique name for your schedule. Example: Weekdays.
- Select a schedule type (Daily, Weekday-Weekend or Custom). When selecting Weekday-Weekend or Custom, also select the days that you want to add to the schedule.
- Use the slider bar to set start and end times for your business hours. For example, if you want your business number to ring through to your mobile phone, but you don’t want to receive those calls between 5:30 PM and 8:30 AM, you would set the slider to 8:30 AM on the left, and 5:30 PM on the right—that is, you are setting the time period that your business number should ring through to your mobile phone. You can use the arrow keys on the keyboard to adjust the sliders in five minutes increments.
- Click Save Changes.
The schedule is added to your account.
Applying Your Schedule
Again, the steps for applying your schedule to call handling rules might differ slightly, depending on your setup. Below, we’ll show how to apply a schedule in your number settings.
- Mouse over Configure and click Manage Numbers.
- Click Edit for the number you want to apply your schedule to.
- For Number Action, click Edit.
- On the Call Handling Rules page, change All Calls to Received During and select your schedule from the drop-down menu on the right.
- Change Select Operation to Forward Call and enter an extension or phone number. In the example discussed above, this would be your mobile extension. Set any other ring settings for the first forward action.
- Then click Add New Rule, leaving the setting at All Calls.
- Change the second Select Operation to Leave Voicemail and select an extension to receive the voicemail.
- Click Save Rule Settings.
The schedule is applied to your phone number, and calls will be routed based on your schedule settings.
Adding a Holiday Schedule
Holiday schedules have to be created and in place at least 24 hours before they are needed or the script won’t apply the holiday rules.
- Mouse over Configure and click Add a Schedule.
- Enter a unique name for your schedule. Example: Holidays.
- Ignore the Schedule Type and Hours sections of the schedule page, you are only going to need the Holidays and Date Ranges section of this page.
- Select the “Yes” bubble next to the following option, Add a holiday or date range to this schedule?
- Under the Add a Holiday tab, you can select predetermined holidays, and click the “+ Add” button.
- Once added, you can choose if this entry should only be used once.
- You will also be able to use the slider to determine how much of the day you wish to include (if you wish to include the entire day, make sure to drag the slider all the way to the right). You can use the arrow keys on the keyboard to adjust the sliders in five minutes increments.
- Lastly, you can determine how many days before and how many days after the specified holiday you wish your schedule to apply to in the exact same way.
- Under the Add a Date Range tab, you can specify a start and end date, and click the “+ Add” button.
- Once added, you will be able to use the slider to determine how much of the day you wish to include (if you wish to include the entire day, make sure to drag the slider all the way to the right). You can use the arrow keys on the keyboard to adjust the sliders in five minutes increments. Note: If you can’t see the hours to the left of your custom date range slider, please save the page and edit the page again in order for it to appear.
- Click Save Changes.
The holiday schedule is added to your account.